(Adding categories) |
No edit summary |
||
| (25 intermediate revisions by 3 users not shown) | |||
| Line 1: | Line 1: | ||
| ⚫ | |||
| − | |||
| ⚫ | |||
| − | == |
+ | ==The Face== |
| + | [[File:Wikia-Visualization-Add-2.png|thumb]] |
||
Levels 1-5 |
Levels 1-5 |
||
| − | Boss: The Queen Bee |
+ | Boss: [[The Queen Bee]] |
Strategic implications: The arena has a few areas where the enemy can be trapped along the walls. The bottom smile has 3 walls that can trap enemies spawning from the bottom. The two pillars can trap enemies spawning from the left and right. |
Strategic implications: The arena has a few areas where the enemy can be trapped along the walls. The bottom smile has 3 walls that can trap enemies spawning from the bottom. The two pillars can trap enemies spawning from the left and right. |
||
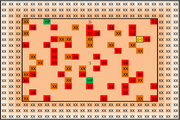
| + | ==The Burned Face == |
||
| + | Levels 5-10[[File:Wikia-Visualization-Main.png|thumb]] |
||
| ⚫ | |||
| − | ==Arena 2 == |
||
| + | Strategic implications: The arena has a few fire traps. Coax the enemy to stay in the fire and continue to burn to maximize damage done to the enemy. The walls can also be used to trap the enemy but more care is needed to ensure the enemy is not able to peek around the wall and find you. |
||
| − | Levels 5-10 |
||
| + | ==The Butterfly== |
||
| + | [[File:The_Butterfly.png|thumb]]Levels 5-10 |
||
| − | Boss: |
+ | Boss: [[The Dragon]] |
| − | Strategic implications: The arena has a few fire traps. Coax the enemy to stay in the fire and continue to burn to maximize damage done to the enemy. |
+ | Strategic implications: The arena has a number of bottomless pits which need to be avoided. The arena has a few fire traps. Coax the enemy to stay in the fire and continue to burn to maximize damage done to the enemy. The walls at the edges of the arena can be used to trap enemies if you move strategically. |
| + | ==The Box== |
||
| + | [[File:The-Box.jpg|thumb]]Levels 5-10 |
||
| + | Boss: [[The Dragon]] |
||
| − | ==Arena 3 == |
||
| + | Strategic implications: The arena acts as an introduction to the pressure switch mechanic. Move the movable wall on to the pressure switch to remove the switch walls. The walls at the center of the arena can be used to trap enemies. |
||
| − | Levels 10-15 |
||
| ⚫ | |||
| ⚫ | Strategic implications: The arena is designed to be claustrophobic. The enemies can get to the center of the arena easily however it is difficult for the player to get out. There are also HP Blocks on the left and right of the arena. Use spells to either fortify the center or use spells to escape the center to a more defensible position. |
||
| + | ==The Crossroads == |
||
| + | Levels 10-15[[File:Wikia-Visualization-Add-3.png|thumb]] |
||
| ⚫ | |||
| − | ==Arena 4 == |
||
| ⚫ | Strategic implications: The arena is designed to be claustrophobic. The enemies can get to the center of the arena easily however it is difficult for the player to get out. There are also HP Blocks on the left and right of the arena. Use spells to either fortify the center or use spells to escape the center to a more defensible position. |
||
| − | Levels 15-20 |
||
| + | ==The Forbidden Garden== |
||
| + | [[File:The_Forbidden_Garden.png|thumb]]Levels 10-15 |
||
| ⚫ | |||
| + | Boss: [[The Grim Reaper]] |
||
| ⚫ | |||
| + | Strategic implications: The cracked terrain in this arena makes it increasingly dangerous as the terrain turns into bottomless pits and limits the player's movement options. Use cracked terrain to your advantage by hitting enemies with ranged attacks while they are on cracked terrain to try to destroy the terrain for an immediate kill. Only pursue the HP boxes in the corners when the enemy is far away as it is easy to become trapped in the narrow corridor, surrounded by bottomless pits. |
||
| + | ==The Obstacle Course== |
||
| + | <p style="margin-top:0.4em;margin-bottom:0.5em;">[[File:The-Obstacle-Course.jpg|thumb]]Levels 10-15</p> |
||
| + | Boss: [[The Grim Reaper]] |
||
| − | ==Arena 5 == |
||
| + | Strategic implications: This is the only level 10-15 arena that has a treasure chest. However in order to access the treasure chest, the player needs to navigate a movable wall through an obstacle course to get to a pressure switch while enemies attack from all angles. Be patient with this arena as you will need to multitask and one wrong move can result in the treasure chest being completely inaccessible. |
||
| − | Levels 20-25 |
||
| + | ==The Hidden Treasure == |
||
| − | Boss: Alec Trevelyan |
||
| + | Levels 15-20[[File:Wikia-Visualization-Add-4.png|thumb]] |
||
| ⚫ | |||
| + | Boss: [[The Emperor]] |
||
| ⚫ | |||
| + | ==The Fault Zone== |
||
| + | [[File:The-Fault-Zone.jpg|thumb]]Levels 15-20 |
||
| + | Boss: [[The Emperor]] |
||
| − | ==Arena 6 == |
||
| + | Strategic implications: The cracked terrain in this arena makes it increasingly dangerous as the terrain turns into bottomless pits and limits the player's movement options. Use cracked terrain to your advantage by hitting enemies with ranged attacks while they are on cracked terrain to try to destroy the terrain for an immediate kill. The treasure chests are surrounded by bottomless pits, walls and fire. To access them, use construction on the bottomless pits, demolition on the walls, and extinguish the fire. Alternatively, you could use construction on a bottomless pit directly next to the treasure chest and then teleport there to bypass the wall and fire. |
||
| − | Levels 25-30 |
||
| + | ==The Great Barrier== |
||
| + | [[File:The-Great-Barrier.jpg|thumb]]Levels 15-20 |
||
| − | Boss: |
+ | Boss: [[The Emperor]] |
| − | Strategic implications: |
+ | Strategic implications: In order to access the two treasure chests at the top, this arena requires the player to move a movable wall from the top left of the arena to a heavily fortified pressure switch in the bottom right. |
| − | == |
+ | ==The Reckoning == |
| + | Levels 20-35[[File:Wikia-Visualization-Add-5.png|thumb]] |
||
| − | Levels 30-35 |
||
| − | Boss: |
+ | Boss: [[Alec Trevelyan]] |
| + | Boss: [[Swiper]] |
||
| − | Strategic implications: Arenas 5-7 are randomly generated. Fire will also rain down on to the arena every time a new enemy spawns. Analyze the generated arena and look for potential wall traps or fire pits that you can use to your advantage. |
||
| + | Boss: [[The Ultimate Evil]] |
||
| ⚫ | |||
==Special Arenas == |
==Special Arenas == |
||
| − | '''The |
+ | '''The Pit''' is an arena reserved for the final boss battle with [[The Ultimate Evil]] . |
| − | + | [[The Secret Arena]] is an easter egg hidden in the game. Can you find it? |
|
[[Category:Arenas]] |
[[Category:Arenas]] |
||
| + | [[Category:Types]] |
||
Latest revision as of 06:35, 17 May 2013
This page outlines all of the Arenas in Arena.Xlsm. Arenas gradually introduce new Terrain Types.
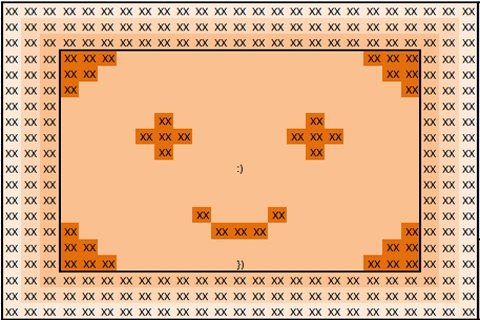
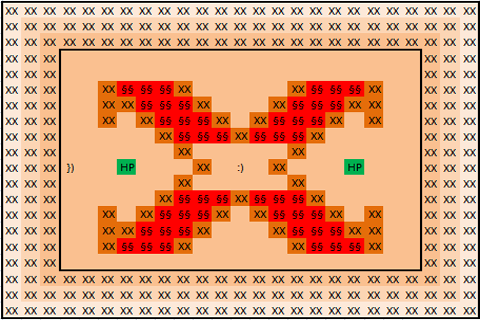
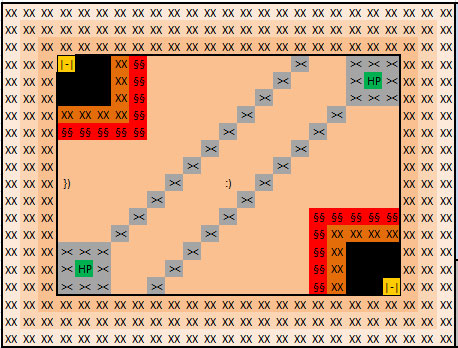
The Face[]
Levels 1-5
Boss: The Queen Bee
Strategic implications: The arena has a few areas where the enemy can be trapped along the walls. The bottom smile has 3 walls that can trap enemies spawning from the bottom. The two pillars can trap enemies spawning from the left and right.
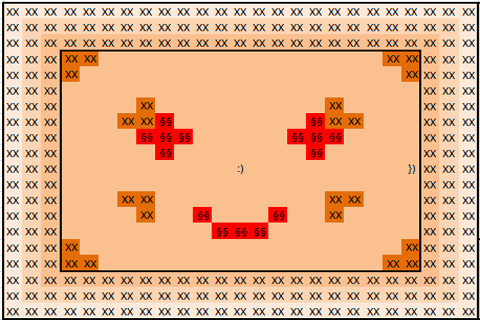
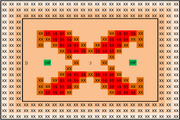
The Burned Face []
Levels 5-10
Boss: The Dragon
Strategic implications: The arena has a few fire traps. Coax the enemy to stay in the fire and continue to burn to maximize damage done to the enemy. The walls can also be used to trap the enemy but more care is needed to ensure the enemy is not able to peek around the wall and find you.
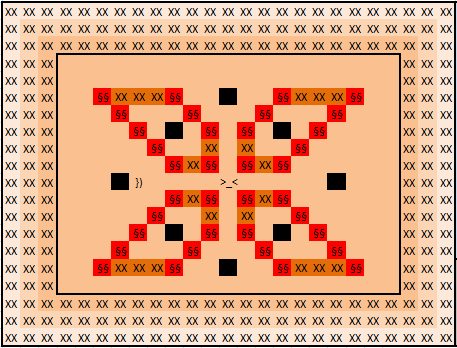
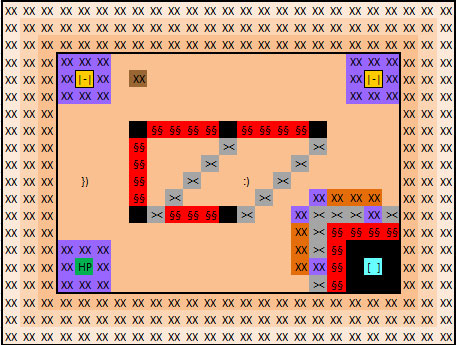
The Butterfly[]
Levels 5-10
Boss: The Dragon
Strategic implications: The arena has a number of bottomless pits which need to be avoided. The arena has a few fire traps. Coax the enemy to stay in the fire and continue to burn to maximize damage done to the enemy. The walls at the edges of the arena can be used to trap enemies if you move strategically.
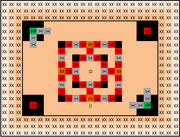
The Box[]

Levels 5-10
Boss: The Dragon
Strategic implications: The arena acts as an introduction to the pressure switch mechanic. Move the movable wall on to the pressure switch to remove the switch walls. The walls at the center of the arena can be used to trap enemies.
The Crossroads []
Levels 10-15
Boss: The Grim Reaper
Strategic implications: The arena is designed to be claustrophobic. The enemies can get to the center of the arena easily however it is difficult for the player to get out. There are also HP Blocks on the left and right of the arena. Use spells to either fortify the center or use spells to escape the center to a more defensible position.
The Forbidden Garden[]

Levels 10-15
Boss: The Grim Reaper
Strategic implications: The cracked terrain in this arena makes it increasingly dangerous as the terrain turns into bottomless pits and limits the player's movement options. Use cracked terrain to your advantage by hitting enemies with ranged attacks while they are on cracked terrain to try to destroy the terrain for an immediate kill. Only pursue the HP boxes in the corners when the enemy is far away as it is easy to become trapped in the narrow corridor, surrounded by bottomless pits.
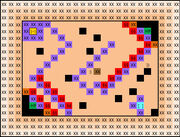
The Obstacle Course[]

Levels 10-15
Boss: The Grim Reaper
Strategic implications: This is the only level 10-15 arena that has a treasure chest. However in order to access the treasure chest, the player needs to navigate a movable wall through an obstacle course to get to a pressure switch while enemies attack from all angles. Be patient with this arena as you will need to multitask and one wrong move can result in the treasure chest being completely inaccessible.
The Hidden Treasure []
Levels 15-20


Boss: The Emperor
Strategic implications: The arena has a number of beneficial elements including two HP Blocks and a Treasure Chest; however, all of them are walled off and inaccessible to the player immediately. You can use Telekinesis, Demolition, or Teleport to access the walled off areas.
The Fault Zone[]
Levels 15-20
Boss: The Emperor
Strategic implications: The cracked terrain in this arena makes it increasingly dangerous as the terrain turns into bottomless pits and limits the player's movement options. Use cracked terrain to your advantage by hitting enemies with ranged attacks while they are on cracked terrain to try to destroy the terrain for an immediate kill. The treasure chests are surrounded by bottomless pits, walls and fire. To access them, use construction on the bottomless pits, demolition on the walls, and extinguish the fire. Alternatively, you could use construction on a bottomless pit directly next to the treasure chest and then teleport there to bypass the wall and fire.
The Great Barrier[]
Levels 15-20
Boss: The Emperor
Strategic implications: In order to access the two treasure chests at the top, this arena requires the player to move a movable wall from the top left of the arena to a heavily fortified pressure switch in the bottom right.
The Reckoning []
Levels 20-35

Boss: Alec Trevelyan
Boss: Swiper
Boss: The Ultimate Evil
Strategic implications: The Reckoning is randomly generated and will regenerate after each boss kill. Fire will also rain down on to the arena every time a new enemy spawns. Analyze the generated arena and look for potential wall traps or fire pits that you can use to your advantage.
Special Arenas []
The Pit is an arena reserved for the final boss battle with The Ultimate Evil .
The Secret Arena is an easter egg hidden in the game. Can you find it?